广树管理员
2026-07-08 20:32
@Chise Hachiroku:为什么会有2种?我不管,适配我现在的就行了,以后遇到再说


萌即是正义!时不时分享一些ACG活动记录与有趣代码的小站!


前情回顾
上回链接:《2D WebGL renderer Pixi.js v4 入门【第五回】》
上回学习了WebGL的各种图像与文字的绘制。
检测碰撞
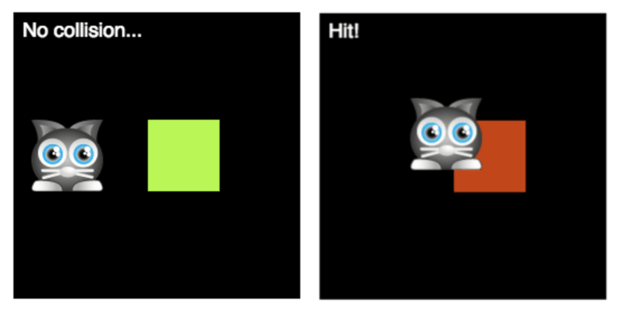
上图为理想状态。
左边的猫能够使用键盘操作,右边的块是无法移动的,然后上面的信息提示状态。
在基于<第三回>的键盘控制所写的代码中,
改造和追加了一部分代码。
var 猫, 块, 消息, 状态;
function setup(){
  放入猫;
  制作块;
  消息初始化;
  设置键盘事件的移动数值;
  将状态设定为play;
  gameLoop();
}

function play(){
  接收键盘的移动数值;
  if(碰撞){
    变化块的颜色和消息;
  }else{
    回滚块的颜色和消息;
  }
}

function 碰撞(r1, r2){
  查找每个元素的中心点;
  计算每个元素一半的高和一半的宽;
  r1的一半高度和r2的一半高度相加;
  r1的一半宽度和r2的一半宽度相加;

  if(r1,r2的中心点距离 < r1,r2 相加的距离){
    碰撞;
  }
}
翻译成代码就是这样
var cat, box, message, state;

function setup() {
  box = new PIXI.Graphics();
  box.beginFill(0xCCFF99);
  box.drawRect(0, 0, 64, 64);
  box.endFill();
  box.x = 120;
  box.y = 96;
  stage.addChild(box);

  cat = new Sprite(resources["images/cat.png"].texture);
  cat.x = 16;
  cat.y = 96;
  cat.vx = 0;
  cat.vy = 0;
  stage.addChild(cat);

  var left = keyboard(37),
      up = keyboard(38),
      right = keyboard(39),
      down = keyboard(40);

  left.press = function() {
    cat.vx = -5;
    cat.vy = 0;
  };
  left.release = function() {
    if (!right.isDown && cat.vy === 0) {
      cat.vx = 0;
    }
  };
  up.press = function() {
    cat.vy = -5;
    cat.vx = 0;
  };
  up.release = function() {
    if (!down.isDown && cat.vx === 0) {
      cat.vy = 0;
    }
  };
  right.press = function() {
    cat.vx = 5;
    cat.vy = 0;
  };
  right.release = function() {
    if (!left.isDown && cat.vy === 0) {
      cat.vx = 0;
    }
  };
  down.press = function() {
    cat.vy = 5;
    cat.vx = 0;
  };
  down.release = function() {
    if (!up.isDown && cat.vx === 0) {
      cat.vy = 0;
    }
  };

  message = new PIXI.Text(
    "No collision...",
    {font: "18px sans-serif", fill: "white"}
  );
  message.position.set(8, 8);
  stage.addChild(message);

  state = play;

  gameLoop();
}

function play() {
  cat.x += cat.vx;
  cat.y += cat.vy;

  if (hitTestRectangle(cat, box)) {
    message.text = "hit!";
    box.tint = 0xff3300;
  } else {
    message.text = "No collision...";
    box.tint = 0xccff99;
  }
}

function hitTestRectangle(r1, r2) {
  var hit, combinedHalfWidths, combinedHalfHeights, vx, vy;
  hit = false;

  r1.centerX = r1.x + r1.width / 2;
  r1.centerY = r1.y + r1.height / 2;
  r2.centerX = r2.x + r2.width / 2;
  r2.centerY = r2.y + r2.height / 2;

  r1.halfWidth = r1.width / 2;
  r1.halfHeight = r1.height / 2;
  r2.halfWidth = r2.width / 2;
  r2.halfHeight = r2.height / 2;

  vx = r1.centerX - r2.centerX;
  vy = r1.centerY - r2.centerY;

  combinedHalfWidths = r1.halfWidth + r2.halfWidth;
  combinedHalfHeights = r1.halfHeight + r2.halfHeight;

  if (Math.abs(vx) < combinedHalfWidths) {
    if (Math.abs(vy) < combinedHalfHeights) {
      hit = true;
    } else {
      hit = false;
    }
  } else {
    hit = false;
  }

  return hit;
};
分析之后,发现还挺简单的。
如果没问题的话就进入正题吧。
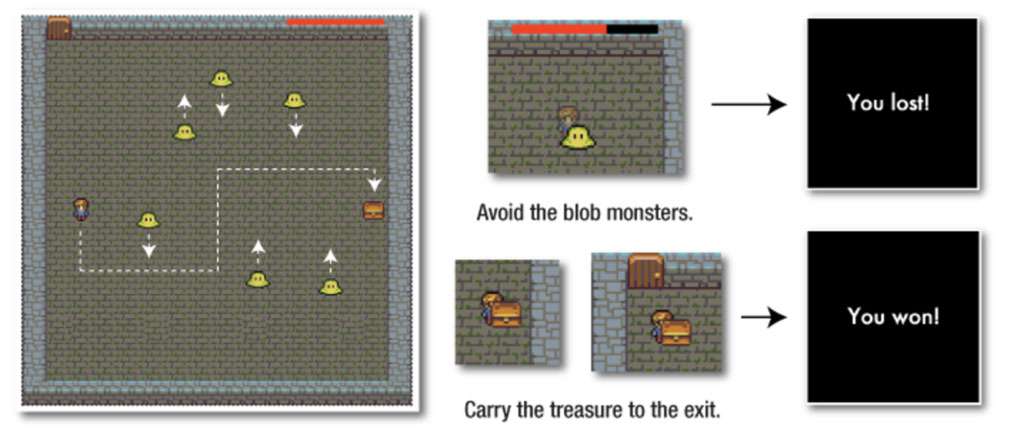
寻宝游戏
游戏原型大致是这样:避开怪物,获取宝物,从门那里出去后成功。如果碰到怪物的话减少HP。减完了则判断为输。
代码设计
// pixi.js的初始化以及图像的读取

function setup() {
  // 初始化,然后游戏状态切换为play。
  // gameLoop();
}

function gameLoop() {
  // 描绘,并将精灵传递到render。
}

function play() {
  // 游戏所有的逻辑写这里。
}

function end() {
  // 游戏结束后。
}

// 其他必要的helper functions:
// `keyboard`, `hitTestRectangle`, `contain` and `randomInt`
首先将游戏场景和游戏结束场景分开。(不同的Container)
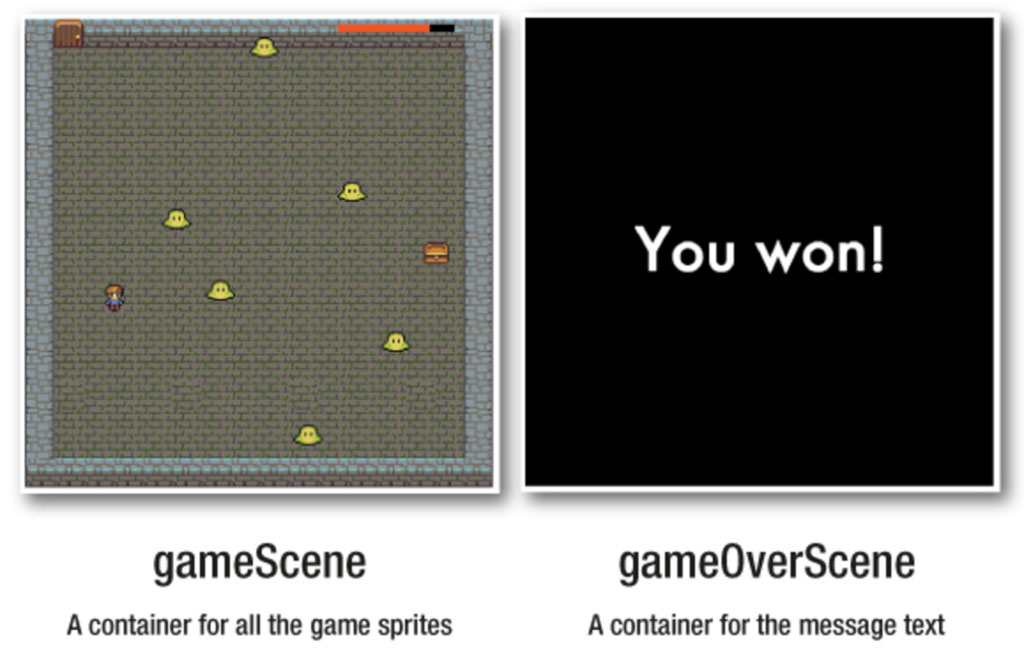
gameScene = new Container();
stage.addChild(gameScene);

gameOverScene = new Container();
stage.addChild(gameOverScene);
然后,先将gameOverScene隐藏。
gameOverScene.visible = false;
游戏场景
首先将简单的洞窟背景、门、勇者、宝箱描绘出来。
id = resources["images/treasureHunter.json"].textures;

//洞窟
dungeon = new Sprite(id["dungeon.png"]);
gameScene.addChild(dungeon);

//门
door = new Sprite(id["door.png"]);
door.position.set(32, 0);
gameScene.addChild(door);

//勇者
explorer = new Sprite(id["explorer.png"]);
explorer.x = 68;
explorer.y = gameScene.height / 2 - explorer.height / 2;
explorer.vx = 0;
explorer.vy = 0;
gameScene.addChild(explorer);

//宝箱
treasure = new Sprite(id["treasure.png"]);
treasure.x = gameScene.width - treasure.width - 48;
treasure.y = gameScene.height / 2 - treasure.height / 2;
gameScene.addChild(treasure);
接下来制作随机移动的怪物。
// 设定怪物数量

var numberOfBlobs = 6,

    // 怪物与怪物之间的间距

    spacing = 48,

    // 从左边开始最初的空隙

    xOffset = 150,

    // 速度

    speed = 2,

    // 方向

    direction = 1;


// 储存怪物的数组

blobs = [];


// 按照设定的数值描绘怪物

for (var i = 0; i < numberOfBlobs; i++) {


  // 怪物出生(?)

  var blob = new Sprite(id["blob.png"]);


  // 空出沿x轴一定距离的空间

  var x = spacing * i + xOffset;


  // y坐标(随机)

  var y = randomInt(0, stage.height - blob.height);


  // 给与坐标

  blob.x = x;

  blob.y = y;


  // 方向(direction)为1的话向下,-1的话向上

  // 方向 乘以 速度

  blob.vy = speed * direction;


  // 下一只怪物为反方向

  direction *= -1;


  // 配置到数组中

  blobs.push(blob);


  gameScene.addChild(blob);

}
然后是血条
healthBar = new PIXI.DisplayObjectContainer();
healthBar.position.set(stage.width - 170, 6)
gameScene.addChild(healthBar);

// HP血条的空间
var innerBar = new PIXI.Graphics();
innerBar.beginFill(0x000000);
innerBar.drawRect(0, 0, 128, 8);
innerBar.endFill();
healthBar.addChild(innerBar);

// HP血条的HP值
var outerBar = new PIXI.Graphics();
outerBar.beginFill(0xFF3300);
outerBar.drawRect(0, 0, 128, 8);
outerBar.endFill();
healthBar.addChild(outerBar);

healthBar.outer = outerBar;
这里出现的DisplayObjectContainer和Container和ParticleContainer的差异非常明显呢。
另外,outer的意义现在还不是很清楚,等知道了补充。
游戏结束场景
准备好游戏结束后的生理和失败的消息。
// 写在之前隐藏gameOverScene代码的后面

  message = new Text(
    "The End!",
    {font: "64px Futura", fill: "white"}
  );
  message.x = 120;
  message.y = stage.height / 2 - 32;
  gameOverScene.addChild(message);
play function
已经准备好登场人物和怪物了,现在将游戏时要做什么列了一张表。
勇者移动,移动范围限制。
怪物的移动,移动范围限制,碰撞到墙壁时的反馈。
勇者和怪物碰撞了吗?
勇者和宝箱碰撞了吗?(获得宝物)
勇者和门碰撞了吗?(成功逃出)
游戏成功与失败的判定
然后,整理一下吧!
作为helper function集中起来由play function调用比较好的有
范围限制(判断是否在边界)
碰撞判断
那么,改变代码吧
// 范围限制(判断是否在边界)
// 这里放入的值是能够移动、移动中的精灵(这里为勇者和怪物)和可移动范围
function contain(sprite, container) {
  var collision = undefined;
  // 左
  if (sprite.x < container.x) {
    sprite.x = container.x;
    collision = "left";
  }
  // 上
  if (sprite.y < container.y) {
    sprite.y = container.y;
    collision = "top";
  }
  // 右
  if (sprite.x + sprite.width > container.width) {
    sprite.x = container.width - sprite.width;
    collision = "right";
  }
  // 下
  if (sprite.y + sprite.height > container.height) {
    sprite.y = container.height - sprite.height;
    collision = "bottom";
  }
  // 返回值
  return collision;
}
// 判断是否碰撞的函数
function hitTestRectangle(r1, r2) {
  var hit, combinedHalfWidths, combinedHalfHeights, vx, vy;

  hit = false;

  r1.centerX = r1.x + r1.width / 2;
  r1.centerY = r1.y + r1.height / 2;
  r2.centerX = r2.x + r2.width / 2;
  r2.centerY = r2.y + r2.height / 2;

  r1.halfWidth = r1.width / 2;
  r1.halfHeight = r1.height / 2;
  r2.halfWidth = r2.width / 2;
  r2.halfHeight = r2.height / 2;

  vx = r1.centerX - r2.centerX;
  vy = r1.centerY - r2.centerY;

  combinedHalfWidths = r1.halfWidth + r2.halfWidth;
  combinedHalfHeights = r1.halfHeight + r2.halfHeight;

  if (Math.abs(vx) < combinedHalfWidths) {
    if (Math.abs(vy) < combinedHalfHeights) {
      hit = true;
    } else {
      hit = false;
    }
  } else {
    hit = false;
  }

  return hit;
};
// 虽然感觉没必要独立出来,但还是和教程一样分开写吧
function randomInt(min, max) {
  return Math.floor(Math.random() * (max - min + 1)) + min;
}
放入play function
function play() {

  // 用键盘事件中获取的数值来移动
  explorer.x += explorer.vx;
  explorer.y += explorer.vy;

  // 勇者的移动范围
  contain(explorer, {x: 28, y: 10, width: 488, height: 480});
  //contain(explorer, stage);

  // 给勇者一个没有碰撞的初始设定
  var explorerHit = false;

  // 使用怪物的分布
  blobs.forEach(function(blob) {

    // 使其移动
    blob.y += blob.vy;

    // 给怪物一个移动范围的限制,捕捉返回的值
    var blobHitsWall = contain(blob, {x: 28, y: 10, width: 488, height: 480});

    // 判断返回的值,将方向反向
    if (blobHitsWall === "top" || blobHitsWall === "bottom") {
      blob.vy *= -1;
    }

    // 如果和勇者碰上了,就改变刚才碰撞的值
    if(hitTestRectangle(explorer, blob)) {
      explorerHit = true;
    }
  });

  // 如果勇者和怪物碰上了
  if(explorerHit) {

    // 一瞬间半透明
    explorer.alpha = 0.5;

    // HP削减
    healthBar.outer.width -= 1;

  } else {

    // 从半透明恢复
    explorer.alpha = 1;
  }

  // 如果勇者和宝箱碰撞
  if (hitTestRectangle(explorer, treasure)) {

    // 做一个手持宝箱的样子(宝箱的位置一直跟随在勇者右下角)
    treasure.x = explorer.x + 8;
    treasure.y = explorer.y + 8;
  }

  // HP归零则游戏结束,弹出失败信息
  if (healthBar.outer.width < 0) {
    state = end;
    message.text = "You lost!";
  }

  // 宝箱(和勇者)和门碰撞,游戏结束,弹出成功信息
  if (hitTestRectangle(treasure, door)) {
    state = end;
    message.text = "You won!";
  }
}
然后用end function切换场景
function end() {
  gameScene.visible = false;
  gameOverScene.visible = true;
}
游戏完成
补充:关于精灵
精灵除了坐标、visible、旋转之外还有各种设置,详情可以在官方文档中查找。
连接如下
基本上精灵是遵循继承规则的
DisplayObject > Container > Sprite
就此教程结束。
各位看官辛苦了。
本回的代码:进入git
本文翻译自:2D WebGL renderer Pixi.js v4【連載第六回】、2D WebGL renderer Pixi.js v4【連載最終回】
翻译者:广树
转载请注明出处!